
We bought this top-of-the-line Kenmore Elite dishwasher, Model # 665.12793K311, 3 years ago. This is a model produced by Whirlpool. Around that time, our son was 2 years old, and we were having tough time to get enough sleep for him. The dishwasher is located above his bedroom, so we couldn't run our old, noisy dishwasher at night. This Kenmore Elite is one of the most quiet models, and indeed it is amazingly quiet. I barely hear noise even when I'm in the kitchen. We debated whether the hefty price tag (it was around $1400 on sale) was worth spending, but it was one of the top rated models by Consumer Report, and we decided to go for it. We were very happy that we could run the dishwasher any time without worrying about waking up our son. But the long-term durability/reliability is not something what Consumer Report evaluates fully.
Problems after problems:
The satisfaction didn't last for long. After a year or so, the top shelf height adjustment mechanism broke. The plastic tab which is holding a spring broke. By looking at the design, I can see that it isn't designed to last for long. Many people have reported the same problem. I used a small screw to replace the plastic tab, and I could make it functional again. This design flaw is annoying for such as expensive dishwasher, but it is relatively minor to what was going to break later.
After 2 years (fall 2015), it stopped working, and I tried to get help from this appliance repair forum. The problem occurred intermittently at first, so it was difficult to trouble-shoot. First it was stopping in the middle of the wash cycle (after 10 minutes or so), and the display said "push start to resume". When I push the button, it starts, but it quits after 5 seconds of spraying water. It was occasionally completing the cycles, but it was rare. Then it started to have another, slightly different symptom. After it filled up with water, it started to wash, but within 5 seconds, the water pump stoped and the LEDs and all display turns off as if the power is cut of. Then immediately, I heard a click, and it started to wash again for another 5 seconds or so. It keep repeating this reset procedure many many times (instead of keeping ask me "push to resume" every time), or sometime after a couple rounds, it asks "push to resume". This happens in Normal cycle, 1 hour cycle, or quick rinse cycle.
I ran the service diagnostics cycle by quickly pushing "smart wash" - "Pots and Pans" - "normal wash" sequentially for 3 rounds. It would go first 6 tasks (intervals) or so, and displayed customer errors 1-4. But it doesn't complete the rest of the diagnostics cycle after that and shut it down. I disassembled the diverter etc, and cleaned to see if something is stuck. When I re-started the diagnostic cycles, there was a slightly different symptom.
The diagnostic cycles weren't completing and the problem is somewhat intermittent, so I assumed the control circuit was becoming bad. But replacement of the control circuit (pretty expensive) didn't fix the problem, and after a month or so of trouble shooting and replacing parts, I finally got it working again after I replaced water inlet valve and spray arm sensor (I think the former was the real problem). I had to spend $200-300 for the parts.
Repairing the leaking diverter motor:
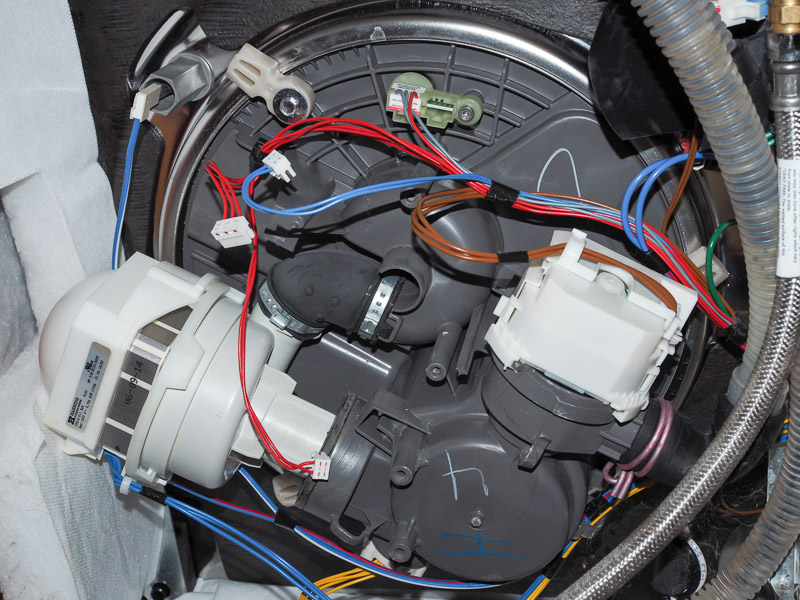
After 1 year of the major repair, it developed another problem in fall/winter 2016. This time, the diverter motor started to leak. From googling around, this is another common problem with this model. The lower spray arm of this dishwasher is not passively moving like most of the dishwasher; a motor controls the movement of the spray arm (see the next photo). I'm guessing the leaking problem is coming from this more complicated mechanisms. In this post, I'm going to illustrate how to repair this problem.

Parts: The leaking diverter motor could be caused by the failure of one of the two seals. One seal is attached to the sump, which is basically the gray plastic part under the lower spray arm in the photo above. If this seal failed, Sears will try to sell you the entire sump (part number: W10457989) for $71. Here is the link to parts diagrams (select Pump, Washarm, and Motor Parts page). Their shipping cost to Alaska is also unreasonably high. Sears isn't a friendly company. So I decided to find a replacement seal by itself. It was a bit tough to get the correct size seal, but I managed to find a replacement from MSP Seals. You have to email them, and ask for OSM 6X16X5 TC FKM. It is $6 each, but you have to order four seals at minimum, and the shipping cost is reasonable with USPS. With the size of the seal, the first number (6mm) is the inside diameter (ID), then the second number (16mm) is the outside diameter (OD), and the last number (5mm) is the height of the seal. The height of the original seal was actually 6mm, but this a little shorter replacement works without a problem. 'TC' in the part number indicates that this seal is a double contact seal, so there are two rings contacting the shaft. The original seal also had the TC profile.
The other possible leaking is caused by a seal inside of the diverter motor. I replaced the sump seal with the one from MSP Seals, but the actual problem was the seal in the diverter motor in my case. The seal was ok, but it slipped off from the correct position and caused the leak. Others have reported the same slipping problem (link to a forum thread). But if you need to replace this seal, here is the measurement: ID=3mm, OD=12.21mm, height is 5.88mm. I haven't ordered this part, but it probably needs 3x12x6. The height is probably not too critical, and 5mm would probably work. If this seal fails, Sears will not sell you the seal, and they will force you to buy the entire motor unit (Dishwasher Diverter Motor, part #:W10380170) for $127. Insane....
Dissassembly:
First, I removed the top shelf. After sliding it out, you can push in the plastic tabs (just above my thumb in the photo below) located at the both sides of the shelf, and bring up the front par of the top shelf.

Below I'm showing the tab on the other side, after I removed the shelf.

This is how the supporting arm looks like after removing the top shelf. For each arm, there are two pockets where the sticking-out parts (one can be seen just above my finger, right of the tab on the photo above) go in.

Now, we need to remove the lower spray arm. You can see the central gear under the middle part of spray arm. You need to twist this central gear counter clockwise a little bit, and it should come off. I think that you just want to twist the gear without twisting the spray arm.

This is how it looks like after you remove the spray arm.

Now, we need to remove the diverter cover, which is the round part to which the spray arm was attached. Before removing the diverter cover, you need to remove the two pipes attached to it.

First, you can remove the lower back sprayer pipe. The lower back sprayer is the gray part with four red round sprayers attached. You can grab the pipe near the diverter cover, and pull it up gently. It should easily come off.

This is how the pipe is connected to the diverter cover. It is simply pushed in. Then the lower back sprayer can be uncliped from the pipe connected to the upper spray arm by simply pulling it forward.

After the lower back sprayer is removed, this is how it looks like. The white part is the place where lower back sprayer pipe was attached. The white part is the diverter, which redirects the water to the lower, upper or back sprayer.

Now we need to remove the upper sprayer pipe, which is a little bit harder to remove.

I twisted the pipe near the back of the dishwasher toward right. Then apply a bit of force to bring the tip of the pipe up. There are two tabs holding the pipe as you can see in the photo below, but they come off by this twisting motion.

Now the diverter cover comes off by twisting the cover counter clock wise about 20 degree, and pulling it upward. There is a locking tab, so you have to bring the tab up while twisting.
You can also remove the diverter (the white part with one hole). You don't have to worry about the location of the hole because it will go back into only one direction due to a key.
After you remove the diverter, you want to put the dishwasher side-way so you can access the bottom of the dishwasher. The combined unit for the diverter motor and lower spray arm motro is the middle white part. There are 3 sets of wire connectors, which you want to remove. Then there are 3 Torx screws you need to remove. You need the star-shaped Torx screwdriver, and I don't know the exact Torx size, but it is fairly small Torx. After removal of the screw, you can pull out the motor unit. There is one push tab which you may need to disengage, but this platic tab comes off easily.

This diverter/lower spray arm motor has the part number of Hankscraft W10380170 Rev G.

After removal of the motor, you can see the hole where the shaft goes in.
Now going inside of the dishwasher, you can see a seal (the brown part). This could be one of the two potential cause of the leakage. Photo below is actually taken after replacement of the seal, so it is brown, but the original one is black. This seal comes off fairly easily by either poking (pushing) from the bottom (or twisting from the top) with a screw driver or something similar.

This is how it looks like when you remove the seal.

This is the removed motor unit. The black seal above the motor unit is the original sump seal. To access the inner seal, which is different from the sump seal, we need to disassemble this motor. This motor doesn't use screws, so you need to unsnap plastic tabs by plying them with flat-head screw drivers. You have to be patient, and gentle to make sure you don't break the plastic tabs. In this side you can see two tabs connecting the top and bottom parts.

This is the other side, and you can see there are 3 tabs on this side, and there are two tabs on the left side. When you look at the white shaft going up from the motor unit in the photo below, the bottom part near the motor unit is fat, and the top park is skinny. You can see the black shadow inside of the fat part of the shaft, near the skinny part. This is the seal which we need to access. I took the photos above and below after I relocated the seal to the correct position, so the seal is in the correct position. But if there is a big space between the seal and the skinny part of the shaft, you have the same problem of the slipped seal.
Note that this motor unit has two motors; one regulating the diverter, and the other driving the lower spray arm. Basically, the metal part and the white plastic part of the shaft moves independently. The inner metal shaft is driving the spray arm. And the outer white plastic shaft is connected to the diverter. The outer sump seal is the seal between the sump and the white plastic, outer shaft. Then the seal inside of the shaft is the seal between the inner metal and outer plastic shafts.

In the photo below, I removed the gear cover just below the shaft. There are three locking tabs on the cover which you need to use a fairly small flathead screwdriver.

The spring, black spacer part, and metal washer slides off. In the photo below, I ordered these parts in the way you need to assemble.

The photo below is showing how the gears are connected. These gears are driving the metal shaft and the lower spray arm.

I removed the motor cover, which is next to the gear cover, at the bottom part of the unit. This motor is driving the lower spray arm.

I removed the connector cover on the top side of the motor unit, but it turned out that I didn't have to remove this cover.

Now we can pull out the inner metal shaft. Actually right after you remove the gear cover, you can pull out this shaft.

This is just showing the structure of the metal shaft, which drives the lower spray arm. The bottom cone-shaped plastic consists of two parts.

To access the seal, which is out target, we need further disassembly. Basically you have to split-open the motor unit. With the bottom half in the photo below, you can see 3 plastic tabs on the top side, 2 on the bottom side, 2 on the right side and 1 on the left side. you have to unsnap these 8 plastic tabs.

Now looking at the top half of the case, you can see the black seal inside of the shaft.

To get the shaft out, you need to remove this lever and spring, which just slide out. This lever is connected to a micro switch on the top right, and this switch feeds back the signal about the diverter position.

This is how it looks lke after the removal of the lever.

Then the outer shaft just slides out. I pushed the seal down by sticking the metal inner shaft from the top (narrow end) of the outer plastic shaft. Since the seal was already slipped down, it came off easily. I inspected the seal, and it looked ok. I covered the seal with a little bit of grease. I'm not sure what is a good grease for this purpose, but I used silicone dielectric grease (probably I bought it from NAPA), which I happened to find in my garage. Then I used the flat side of pencil and pushed into the outer shaft.

This dishwasher is great when it is working. After working with this dishwasher quite a bit, there appear to be a couple of design flaws. Since it isn't designed well, I don't expect that it will last for a long time. I'm very very disappointed, and I will probably avoid most Sears appliances in the near future. Since Sears appliances are designed and produced by other companies, we can't generalize that all of Sears appliances are craps. However, I'm not happy with their attitude; Sears customer/technical service weren't willing to help. Well, they would say that it was out of warranty, so they didn't have to anything. All of the problems which I and many others are suffering from are due to their flawed design. And people would be pissed off if $1400 dishwasher breaks down in 2-3 years. Finally, their part department appear to be trying to make money by selling the parts you don't need to replace. Consumer Reports frequently rates Sears products high, but they should do better research.
Thanks for the helpful write up. You saved me a bundle with a bit of dielectric and a short piece of fuel line to keep the bushing seated in the divertor. I was missing one screw on the divertor mount as well, two out three could have caused wallowing while under torque. I'm about two hours in on it's test run since making adjustments, it's still dry so far. I too agree, I "assumed" I would get more when I pay for premium labeled products. Duh! How foolish of me to assume such a thing. Maybe https://www.mieleusa.com/ next time around?
ReplyDeleteThank you for the comment, Frank. It is indeed frustrating. Mine is still working ok after 2 months or so. But it is not a good feeling thinking what is going to break next...
DeleteGreat article, was about to give up until we reread the section on the bushing and the tubing you used to keep it in place. We followed those instructions and so far no more leaks. What a crappy piece of engineering and how simple the fix could have been for the manufacturer. Keeping fingers crossed that we have solved the problem. Thanks again for the article!!!
DeleteI'm glad that you could fix it. Mine is still working without a leak!
DeleteDid anyone have a spring around this groument? If so how did u get it out?
DeleteThe year is 2025 and I can confirm you're still saving people money and keeping machines out of the landfill with your awesome step-by-step instructions! That second seal was my problem. Like many others had said, I replaced the first seal and was ready to throw in the towel and buy a new machine.
DeleteIn a last ditch effort, I put the diverted motor pump part number into Google and landed on your magical website. I hope you're still reading these comments, you probably have no idea of the widespread impact you've had!
I lucked into finding your article. I have this Kenmore model and had the problem with the upper tray tab breaking also. I also had to replace the tray slides as the plastic holding the ball bearings were broken and binding. Now I have a problem with the lower spray arm not turning. I searched and couldn't find a write up that said there were two parts to the diverter motor: one that drives the gear on the spray arm and another that turns the diverter plate. Since I'm not getting a "postion error," I'm thinking just the gear motor isn't turning. I tried taking the spray arm off and manually tried to turn the shaft but it only turns a few degrees -- not sure if it should turn freely with the gears in the motor involved. I'm not ready yet to tear into it.
ReplyDeleteI haven't had the problem of the lower spray arm not turning YET. But it might be coming with this crap.... I hope that you'll figure it out. Did you run the diagnostic cycles? I don't think that you can spin the gear from the top manually.
DeleteYes, The sprayer bar will not run while engaged to the motor. If you remove the sprayer bar, you do have to engage it by locking it in. If you don't it will wobble off and find it lying off the shaft on its side.
DeleteI also was very fortunate to find your article. I have a $1299 RSRP Kitchenaid Dishwasher (KDTM404ESS0) that has the same diverter motor. It developed the exact same problem with the diverter motor you experienced—within less than a year after being installed. I was able to push the rubber seal back into the plastic shaft (as in your picture above); reassemble the diverter motor; and install it back into the dishwasher with no additional problems. Washer is no longer leaking! GREAT ARTICLE! THANK YOU!!!
ReplyDeleteThank you for comment. I have no idea how this kind of design flow went into the final product!
DeleteExactly! We had ours (665.12793K311) for just over a year, then the logic board like issues similar to yours started. We purchased the extended warranty but were still under the original one. Service guys went through three logic boards across two months and that plus a few angry calls got us a whole new unit. Reason being they had no more boards so the parts department had to fulfill the order with a whole new unit. We got excuses like the temperature of the incoming water was too low to we should not use those detergent packs from the trained experts. We pulled out the manual and pointed out that the manual says the opposite. My bet is the first tech left the fan unplugged in the control area unplugged or broken as I can hear it now in the new unit and subsequent boards were toasted after a few long runs. Wife says there was a spark so perhaps the first tech blew something else out or the supply to the fan.
ReplyDeleteSecond unit in about three years of use we have the same leak as depicted here. Purchased a new part and took the recommended alternate replacement part while ordering instead (W10849447). Took a photo of the old versus new with old internal gasket clearly slipped down the shaft tube (http://bit.ly/2vXKE7v). The shaft surround is a bit different at the bottom but otherwise fits just fine. While I did a test run with the new part in I modified the old part to keep the gasket in place with a length of drip sprinkler tubing as described. Expect to have to fix this again and a spare would be good.
Did not turn out to be leak free with the new part, just a few drips versus the torrent with the old broken part. Bummer, took things apart again and this time took out the washer that “seals” the white shaft surround to the tub. To my surprise that is not a rubbery gasket but a plastic washer of sorts. The bit of food grade grease did not do the trick the first time so used Teflon thread tape compound to seal it with now the original repaired part installed. Second cycle running and so far, so good. Cookie sheet and a water alarm are in order to live under the unit forever to save what is left of my hardwood floors!
For the burned control board (of the first one), I wonder if it is similar to the problem posted in Sept 12, 2017 below. I've disassembled the control board, and it doesn't have any cooling fan.
DeleteI feel like a broken record with the other replies, but I've got to chime in and say, "Me too!" Mine was a case of needing to replace the upside down grommet that so many have complained about. I damaged the inside of mine when I was removing it, so I had to buy a new one. Got 2 (just in case) from AppliancePartsPros.com, part number AP6016787 for $6 each + $9 expedited shipping.
ReplyDeleteBTW, the Torx bit needed to remove the Diverter Motor is a T-15.
Thank you very much for going to the trouble of providing such detailed information. I have the same model of dishwasher, and your information is very useful for working on it. I have a somewhat different problem in that the dishwasher stopped filling. This was traced to two evaporated chip resistors on the control board. Since few of the parts have identifiable numbers and no very complete circuit diagram, I bought a new control board and found that the resistors were each 1 ohm, probably 1/4 watt, in parallel. According to the limited circuit diagram provided, these resistors monitor the current through several triacs. The sum of these currents is too small to overheat the resistors unless something shorts. There is also a relay which can, under unspecified circumstances, add the drain motor current to the others. This is presumably a large enough current to burn out these resistors. The same resistors on the new board burned out after a few usages. Further investigation has found that one of the two windings in the motor that turns the lower spray arm is open, and the problem is in the motor, not the wiring leading to it. There is some water in the motor housing, so it may have been damaged by a leak.
ReplyDeleteThank you for letting us know about the burned resistor problem. I think you are probably right; the motor housing shouldn't have water in it, so it is likely to be the cause of the control board failure.
DeleteI also want to say "MANY THANKS" Naoki for your article - it was a great help in resolving the leaking diverter motor problem on my Kenmore Elite dishwasher. My comments:
ReplyDeleteYour article came up on the first page of a Google search so your fix appears to be popular on the web.
My machine is a model 665.12793K310 (not K311). It looks the same as the photo you posted so I'm guessing mine is just an earlier revision of the same crap machine. In my case the leak was caused by a failure of the seal inside the diverter motor assembly. It fell completely down and was spinning/scraping against the top of the motor frame, which ground a significant amount of the rubber out of the seal.
I will note that to access the inner seal I just split the motor case (8 tabs total). The metal shaft stayed on the gear assembly so I did not need to disassemble any of that (a few steps saved).
Although this machine was purchased less than two years ago so still under parts warranty (2 years parts, 1 year labor on the Kenmore Elite) Sears would not provide a warranty replacement motor unless a technician came out for a service call to look at it. This would cost more than buying the part itself. They would not even accept me bringing the part to the local Sears repair center to show them the problem (so much for my opinion of Sears). The motor was still working but I could not find a replacement for the seal, so ended up ordering a new diverter motor assembly by phone from a local appliance repair shop. It was $90 shipped to my house next day. Less than Sears price and I did not want to give them any more of my money.
The replacement part numbers are either W10843811 or W10849447, but apparently both will work. They both have the slightly different configuration to the plastic shaft than the original W10380170 as "Anonymous" pointed out in his post on August 11, 2017 with photo http://bit.ly/2vXKE7v. I point this out because the new part came in a box labeled "Whirlpool Corporation Factory Certified Parts" with P/N W10843811 on it, but the actual part inside the box was labeled W10849447 Rev. B. It took a few rounds and a 2nd parts order from my local appliance shop before we figured this out (kind of strange Whirlpool would box the part this way and cause confusion). Bottom line is the new diverter motor assembly seems to have resolved the leak completely, at least so far with two full dishwasher runs in.
I did not replace the outer tub seal but it is not leaking. Doing some web searching it appears that Whirlpool had made a replacement seal W10195677 but it is discontinued. I noted your suggestion of MSP Seals in case this one fails.
I also repaired the broken spring tabs for the upper rack with stainless steel machine screws. I drilled 9/64" holes through the plastic brackets adjacent to where the tabs had broken, and "threaded in" #8-32 x 3/4" screws through with a nut on the inside to secure the screws, which created new "tabs".
My control panel hasn't failed but the "Turbo Zone" and "Smart Dry" blue panel lights always stay on but only dimly lit. This has been the case for at least 6 months but no other issues yet. I hope this isn't an indication of a control panel problem yet to come.
I agree when the machine is working it works well, but it's a disaster for reliability. Consumer Reports has become too short sighted to identify reliability issues.
Did you ever resolve the "Turbo Zone" and "Smart Dry" light issue? I have the same thing and can't for the life of me figure it out
DeleteSir you are a lifesaver, was about to spend money on a new dishwasher, decided to give it one more shot with your blog instructions and the new seal from MSP and it worked like a charm!! We cut a plastic spacer to fit above the internal shaft seal to keep it down, no problems! Thanks again for taking the time to write this up. We did a dance and opened a nice bottle of wine!
ReplyDeleteAs appliance tech i would tell you did an excellent job... Eccellente! ))
ReplyDeleteThanks saved me some money , and frustration
ReplyDeleteThanks! I had to buy a new diverter motor as the old one had frozen up with all the mineral deposits. After remodeling my dishwasher surround to eliminate the destroyed particle board cabinets and drywall, it’s back installed. I also replaced the 6mm x 16mm x 6mm tc shaft seal inside the unit from one bought off Grainger. Seems to work so far. Once complete, I ran the diagnostic cycle and was sad to see error codes F9E4 and friends. Eventually I discovered that I could clear the codes after they were displayed and the hi-temp button was flashing (press the hi-temp button to clear). After finishing the diagnostic cycle, I started another one, to find F-E- for all codes - which I interpreted as “no fault found”. Currently running my first real cycle to clean up the backlog of 2 weeks of dirty dishes waiting for that elusive shaft seal to arrive.
ReplyDeleteSadly my story is exactly the same. Same model Kenmore elite. Upper rack tabs broke. Logic board failed and Sears repairman tried to fix it but never really got it back to factory normal.
ReplyDeleteThen the leak started. I bought a new diverter motor, but was sent one that wasn't quite right like Anonymous. So finally buckled down and disassembled the motor, pushed the seal back into place firmly, and the leak is fixed. For now. It needs some kind of retention bushing, but I didn't try to figure that out this time. Wonder how long it will last this time.
Had the diverter inner seal leak. Useful to note from above instructions, i only separated the motor unit with the 8 tabs. Nothing else was necessary to disassemble on the diverter motor once removed from the dishwasher to get at the inner seal. I used a piece of thin tubing as a makeshift bushing and put lots of plumbers grease around inner seal, outer white rod and metal rod, and the external seal in the sump. Leak is gone now! Hope it stays that way.
ReplyDeleteDo you happen to have a photo of the complete bottom of your dishwasher? I disconnected the electrical plugs without taking a picture first. Now I’m not confident that I have everything in the correct place. You can email me at brian_applegate@yahoo.com. What started this adventure was a repairman telling me that I had a faulty pump seal and quoted me $449 to repair. I ordered the part and replaced the seal for $20. Unfortunately he gave me bad info and it appears the divertor motor is leaking instead. I appreciate your information that you have posted. Thanks! Brian
ReplyDeleteSorry, Brian, I looked around to see if I took photos, but I don't have the photo of the bottom of the washer.
DeleteDoes anyone know how to test the diverter motor on the bench? There are 3 electrical connections. A two pin connector and a three pin connector on one side of the diverter. A two pin electrical connector on the opposite side. Guessing the three pin connector is for the spray arm motor (maybe bi-directional. One of the two pin connectors is for the diverter plate motor and the other two pin connector is for the diverter plate position sensor. Anyone know where I can find the two pin and three pin connectors to allow bench testing??
ReplyDeleteI don't know about it, and I hope someone can tell you how to do it.
DeleteYou saved me a ton of time. I had taken some of the washer apart to find the main seal, like others, and assumed it as the problem. Read this and decided to check the inner seal. Found that it fell out as i took it apart, so no it was not seated as it should have been. Thought about putting something in there to try and prevent it from happening again but didn't like that is may rub the seal and make it fail. So i pushed it back in place very sugly and put rest of washer back together. I am running it now and it is not leaking, Thank you for all the time saved, as well as money. I was about to try buying parts and replacing little things until it stop. Again thank you!!!!!!
ReplyDeleteThank you very much for the great tutorial.
ReplyDeleteI was puzzled when repairing my KitchenAid kdtm404ess why replacement of the lower spray arm seal (brown seal on your pictures) did not stop a leak. Go figure that diverter has internal seal. I got the same issue as reported by Naoki: internal seal just slid down on the motor shaft. I happened to have pack of 3/8 Flat Washers (5/8 O.D., Danko 88574) and they nicely went onto the shaft and inside motor housing. Hopefully it will prevent original seal from sliding again.
Couple notes.
1. It's enough to take just diverter motor cover to get access to the seal, no need to take it completely apart.
2. To get Go to www.avxseals.com and order a # TC5.5x16x8 if you need replacement for a larger sump seal (brown seal on pictures in this post).
3. My pictures - https://drive.google.com/open?id=1jAuNoM_WNYzA8kc_9bV__Qw6XKq24RmK
Hi. Did anyone find the top seal visible from Sump seems to be glued ?? I have not been able to remove it in my Kitchen Aid DW. Almost seems they did it purposely to sell entire Sump.
ReplyDeleteThanks.
mine was definitely not glued.
DeleteDid anyone find a replacement grommet/seal for the inner diverter motor shaft?
ReplyDeleteDo you mean grommet inside diverter motor?
DeleteYes.
DeleteAll I can say is f Kenmore and Whirlpool, and any other brand hidden under their storefront name for garbage! Don't ever buy any of their junk again! Amana, Kenmore, Whirlpool, Maytag, Kitchenaide...etc. They're all the same thing with a different badge on the door. We bought the upper models of the entire Kenmore Elite set Black Friday 2016. Not one of them has remained problem free. The latest is this fiasco with the dishwasher. Brand new hickory floors destroyed from the leak. I have fixed my own appliances for decades and tried getting the seal out without success about 5 minutes ago. I even used a seal remover. It just destroyed the seal, and couldn't get it out. Noone sells the dang thing anymore anyway. So now I'm stuck buying a $110 motor, doing a couple hours of labor ripping the dishwasher out, and then I get to repeat in less than 4 years after floors are destroyed. I'd rather drop the entire machine on a Kenmore corporate talking head and watch it pop.
ReplyDeleteMoving on, the highend 30cuft fridge [both] compressors (samsung made) are shot, the range burners don't auto ignite, the flames are useless on all but the boiler burner, the microwave bulbs (inside and out) burned out multiple times (good luck getting to the inside bulb), and the microwave convection can't regulate temperature consistently. All in less than 4 years. Even at Black Friday prices, this set is worthless.
An of course all you can get ahold of to talk to anyone is a bankrupt Sears hotline.
This post saved me about $800. I could tell the leak was coming from the diverter motor but was having a hard time understanding how that could be the issue. After finding this post, learning how these parts work and how common this problem is, I replaced the diverter motor and no more leaks! Thanks!
ReplyDeleteI can't thank you enough for this post. I have the exact same diverter motor that was leaking. Thinking it was the sump seal, I ordered a new sump assembly which included the sump seal which is not sold separately. After all that work to replace the sump, it leaked worse than before. I found your post and disassembled the diverter motor following the detailed directions above and found the inner metalic shaft seal/grommet had slipped all the way down the shaft. I pushed it back up into place and leak completely stopped. What really surprised me is the large quantity of water that was leaking down between the outer plastic shaft and inner metal shaft in the diverter motor. There is virtually no daylight between those shafts so I don't understand how so much water is forced between an almost non-existent gap. My guess is maybe the water is forced in under pressure from the main motor into the sump and makes sense it would have to be under pressure get to the spray arms above it which could explain why so much water is being forced through in between the shafts. Thinking about it more, there is vibration from the diverter motor itself, expansion and contraction of the inner diverter motor seal, exposure to water under pressure over time, and gravity that may cause tiny slipages of the seal that eventually causes the leak. Since there is nothing to hold the seal in place, I wonder if an adhesive could be used to hold the seal in place. The downside is you could never replace the seal if it was glued in place.
ReplyDeleteVery informative and impressive post you have written, this is quite interesting and i have went through it completely, an upgraded information is shared, keep sharing such valuable information. Hope you will continue with new article.
ReplyDeleteLeak Diverters
My Kenmore Elite 665.12793K311 is 5 yrs old and I could see the leak from the diverter motor pump. I hired someone to help fix this and he charged me $80 to tell me it is not fixable and I need to replace it. At this point, I figured I had nothing to lose so thought to attempt to fix it on my own. Google search lead me to a blog. I am so grateful for your detailed blog. Many of the people here said the gasket inside the diverter pump/motor had backed out. I noticed the same thing when I took the motor apart. Followed the instructions in this blog, pushed the gasket in, and added a piece of semi-stiff plastic tubing to keep the gasket from sliding down again in the future. Ran a rinse cycle and no more leaks. It took me 2 hrs. to disassemble everything and about 15 min to put it all back together. I can't thank you enough for preventing my dishwasher from going into the landfill. Keep up the good work. Really appreciate the thorough details you have provided here for ammature people like me who love to fix things.
ReplyDelete