I got a surprise when I came back from a long family vacation in Miami and Florida Keys. Blooming Masdevallia racemosa! It was the biggest vacation for our family since our son, Taiga, was born 4 years ago. Even though daily high was 86F in Miami, it was a bit too hot for us accustomed to Alaska. We still enjoyed sun, ocean, beach, zoo, and other things which were first for Taiga. We did lots of shell collection, and we also chased lots of exotic insects, lizards, fish, invertebrates with small nets. Little Taiga is quite a biologist just like his parents! The vacation included my first visit to the Redland International Orchid Festival. It was great, but I feel a bit guilty of buying so many orchids. I'm mostly done with potting/mounting, but it was a lot of work! It would be great if I can write more about the vacation in the future post, but it could take a bit of time to organize all of the photos.
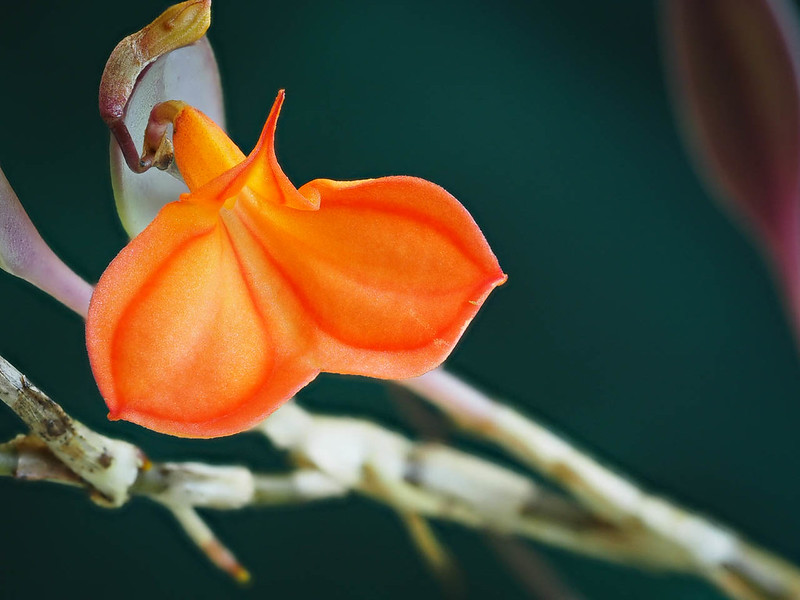
Masdevallia racemosa is native to high altitude (2800-3900m) of Columbian mountains according to this IOSPE page. So it seems to require a somewhat specialized environment. But with an appropriate temperature range, it seems to grow fairly rapidly (well, slower than typical Masdevallia, though). When I got this plant from Ecuagenera in spring 2014, it was about 7 cm long. I laid it on the sphagnum moss in a clay pot. Then it immediately started to climb up, and after 2 years, the height became about 25cm tall. I'm just leaving it as is for now, but I'm not sure how to deal with this climbing/rambling habit. Here is the plant from 2016:

This is how it looked like when I received it in 2014:

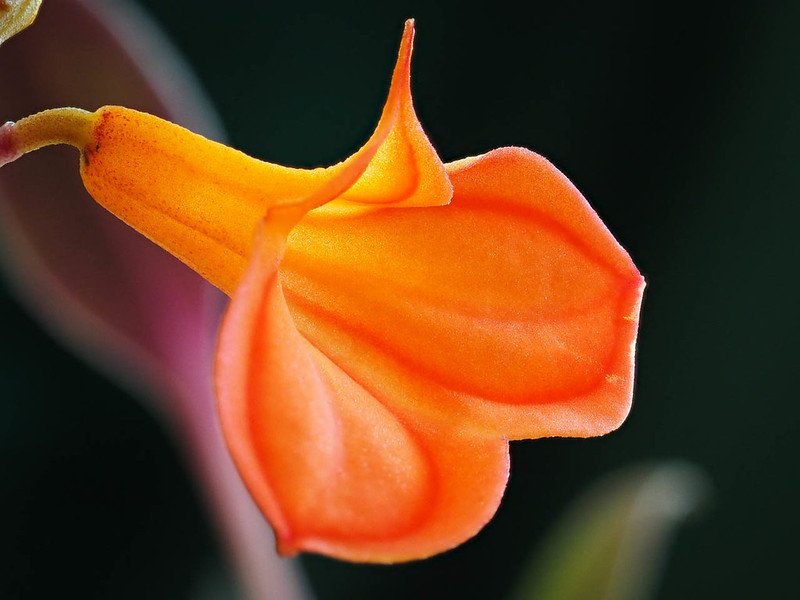
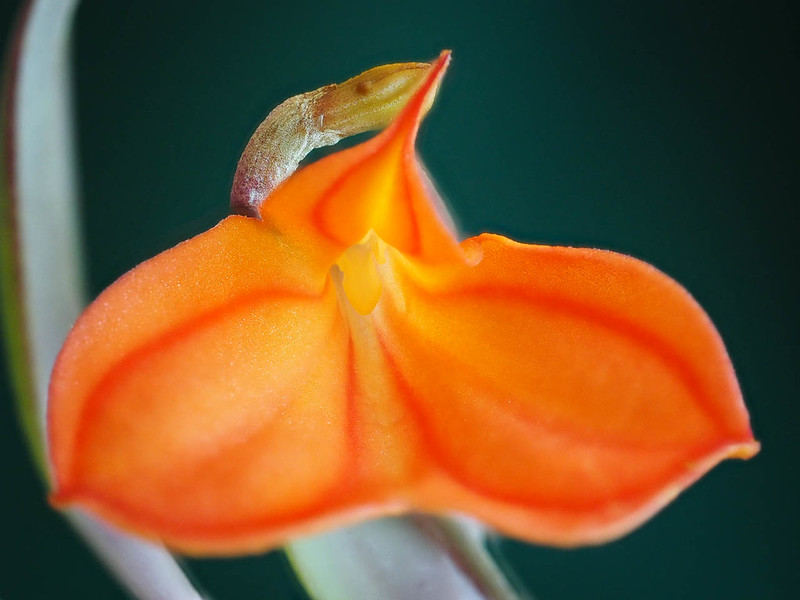
The close-up photos of the flower may be a bit misleading with regard to the size. From photos I had seen in books, I thought that they may have fairly large flowers. But the width of the flower is about 2-2.5cm. The color of this flower is amazing, and I'm very exited to see the flower!
I'm using lots of new things (to me) for these photos. I have been using Apple Aperture for post-processing. I really like the interface of Apple Aperture, but Apple isn't going to develop this software any more. so I have been looking for an alternative. I'm not so keen on the direction of Adobe products (or their general interface), but I ended up buying Adobe Lightroom. I'm not quite accustomed to how things are adjusted in this software, so it is very difficult to get the post-processing done.
I'm also using a new camera. Just before the trip to Florida, I bought Olympus E-M1. I had to learn how to use this camera in the airplane to Florida. After using it extensively during the vacation, I have to say that I really love the interface of this camera, and the quality of image is excellent. An updated version of E-M1 will be released soon, but I'm very happy with this camera. One of the cool feature of this camera is in-camera focus stacking. I used this feature for all of the flower photos above. Now, what is focus stacking? When you are taking close-up photos, the focused area becomes narrow (shallow depth of field, link to wikipedia). So when you focus on the tip of the column, sepals and petals may be blurry. With focus stacking, the camera automatically takes multiple photos with slightly shifted foci (E-M1 takes 8 photos). Then the camera combines the 8 photos automatically to create a photo with expanded depth of field. It is a common techniques for macrophotography. You can do it without a special equipment or camera, but you need to use some software to do the focus stacking at the post-processing stage. This website (Extreme Macro) about insect photography covers lots of advanced topics in macrophotography, and it has a nice tutorial about focus stacking (link), too. But with E-M1, all I have to do it push the shutter button!
The flower photos are mostly out of camera JPEG images with a bit of minor editing. If I blow up the image and pixel-peep, I can see stripes of very sharp areas and slightly less sharp areas. This means that I probably need to set a shorter focus interval in E-M1 setting or use a higher f-stop.
There are several settings which can be adjusted in E-M1, and I will need a bit more experimenting to use this feature better. Even without tweaking, it seems to do decent jobs in the photos above. But in the photo below, you can see a bit of artifact (see the right edge of the dorsal sepal). Here is a link to Olympus webpage talking about the focus stacking feature of E-M1. I used fairly dim natural light for these photos. One cool aspect is that I can use the flash with focus stacking, too. Basically I can adjust the time delay during the focus bracketing, which allow the flash to recharge.
Just for a reference, this is the environment for my cool-growing orchids:
- Temperature: 20C (68F) day, 10C (50F) night. The temperature stays constant at 20C during the day and at 10C during the night.
- Relative Humidity: constant 80%
- Light: 13h day, photosynthetic photon flux density (PPFD) of 120 µmol m-2 s-1 from florescent and LED light. But since the plant became tall, it is getting much more light at the top of the plant.
- Water: RO water from MistKing twice a day (50 seconds each), the roots stay moist.
- Potted in a 4" Terra-cotta pot with Sphagnum moss.
- Fertilizer etc.: Dyna-Gro Grow at 20ppmN + equal amount of Dyna-Gro ProTeKt + MaxiCrop (2TBS/gallon). I spray this mixture about 2-3 times per week. When it looks stressed, I add 4 tablets of 325mg aspirin per gallon to the fertilizer mix.
Comments
Post a Comment