I have been trying to grow Disa uniflora. I could make them flower in the first year, but it didn't make a new growth for the next year. In an attempt to improve the environment for them, I made a small ebb-flow hydroponic system for my second year of Disa growing. Most parts are from Lowes/Home Depot. This system makes it easy to give sufficient water to Disa. The EC of the water seems to go up after a while, so I do have to change the water in the reserver occasionally, though. Currently, the plants get water twice a day.
The summer is the difficult time for these cool growing Disa. The survival rate wasn't as high as I hoped for and there were quite a bit of death over the summer. But I may have some survivors which might flower for the next year. So it is a little bit of progress forward. The next step may be that I need to add refrigerated unit like what Tennis did in his informative page.
I don't have enough experience to write about Disa culture, but I found the following Master's thesis by Danita Pienaar to be very useful.
Pienaar, D. 2005. A study of greenhouse production techniques for evergreen Disas. U. of Stellenbosch.
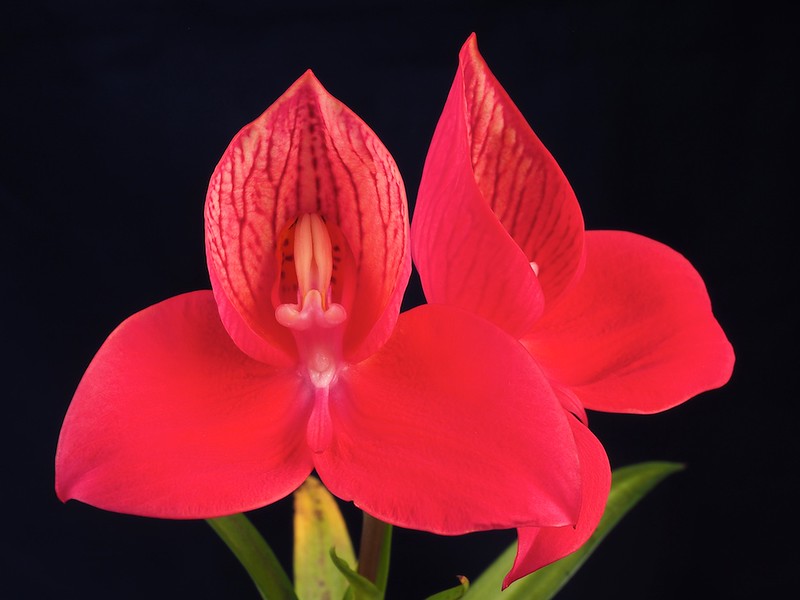
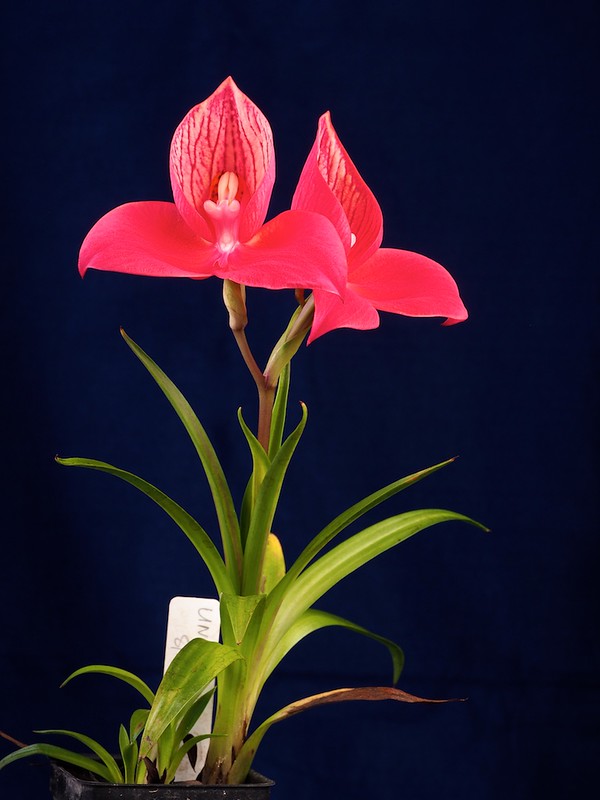
The red individual above is Disa uniflora 317 'NT3' purchased from Wally Orchard of Afrodisa. This one flowered in late September, which is pretty late for this species.
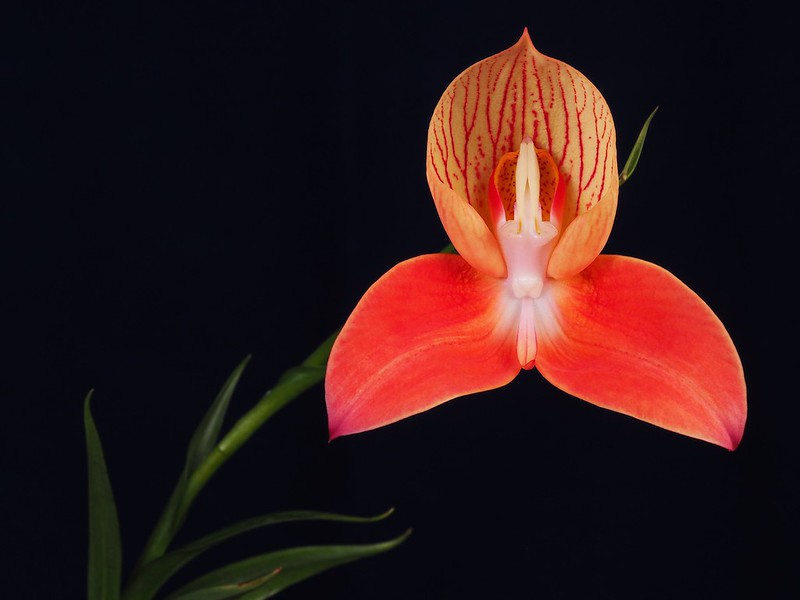
Orange individual below flowered in more normal time (late June):
Disa uniflora 319 purchased from Wally Orchard of Afrodisa.
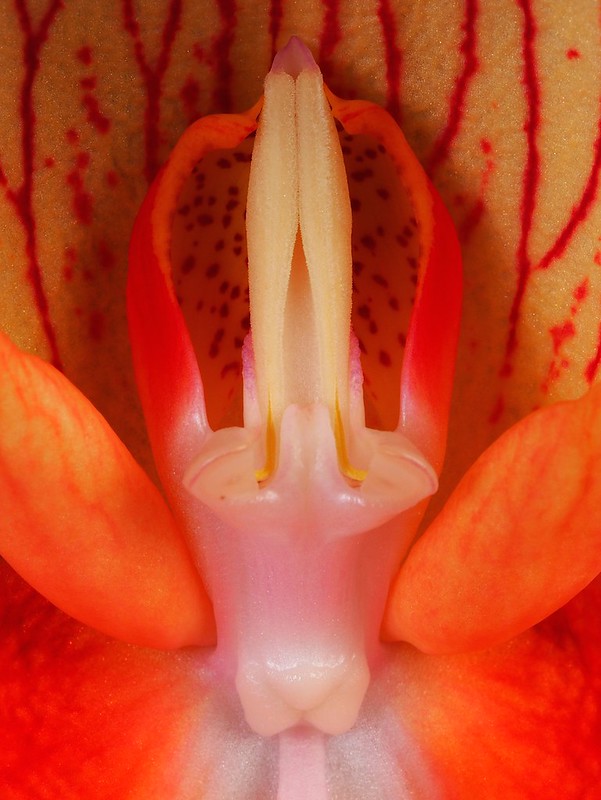
Details of the column:
Step-by-step assembly of ebb-flow system:
Parts:
- Sterilite 27 gallon plastic container (for the grow box), $15.55 from Walmart.
- Rubbermaid Roughneck 18 gallon plastic container (for the reservoir), around $12.
- PonicPump 12005 (submersible pump used for fountains, 120GPH @ 0' lift, 6W), about $14
- Watts PL-1871 1/2" Bulk Head Union, $10.98 from Lowe's
- Watts LFS-385 Brass Hose barb (1/2" ID x 1/2" MIP), $4.58 from Lowe's
- kbi TMS-0500 1/2" MIP to 1/2" CPVC adapter, $5.10 from Lowe's
- 1/2" CPVC street elbow, $0.98 from Lowe's
- 1/2" CPVC (short section)
- 1/2" vinyl tubing (5/8" OD x 1/2" ID), 7' for $3.15 from Lowe's
Total: about $67
Additionally, to automate the filling, an appliance timer to turn on and off the water pump is useful.
I got two plastic containers: one is for the growing space and the other is for the water reservoir.
First, I made the drain hole to the growing case. Since the plastic is a bit flimsy, I decided to use a bulk head union. Without thinking too much I started to drill with a hole saw (right bottom piece in the photo below).

Oops, it was not a good idea, and this was what happened. I should have used a supporting block and/or duct tape.

Well, I had to go back to Walmart to get a new box. This time, I used a soldering iron (toxic fume but less likely to screw up). I put a nail to the soldering iron because I didn't want to ruin the soldering iron tip.

The bulkhead is attached:

Here are the other parts needed.
From left:
Brass Hose barb (1/2" ID x 1/2" MIP), which is screwed into the bulkhead from outside, and it is connected to the return tube to the reservoir.
1/2" MIP to 1/2" CPVC adapter
1/2" CPVC street elbow
1/2" tubing

Attached the hose barb adapter to the outside. I had to use the Teflon tape for plumbing for this connection (otherwise, it was leaking).

Here I'm showing a street elbow (one side is male, and the other side is female) attached to the MIP to CPVC adapter. I'm drilling two small holes (5/64"). These small holes make the water to drain out slowly.


Now, I cut a small section of 1/2" CPVC. The length of this pipe determines the water level when the water is pumped in to the growth case.

Now I attach the assembled elbow to inside of the bulkhead. Here is the inside view of the bulkhead.

Screw in the MIP to CPVC adapter. Then attach the elbow and the drain pipe. The CPVC parts are not glued, just friction fitted.

I made two tables from a cedar siding plunk that I happen to find in the backyard and legs are from some branches that I found in the firewood pile. Later, I painted these with water-proofing Elastomeric paint (frequently used for roofing). Also I made a hole to the top right for the water supply tube. The water pump supplies water through the tubing through this hole.

Assembly done:


I made a green table from left-over lumbers and set up the system on top of it. I made two holes to the cover of the reservoir: one for the tube going to the growing box and one for the returning tube.

Here the water is filled up. The water will gradually return to the reservoir through the two small holes of the elbow. I adjusted the height so that it reaches to 2/3 of the pot. I can adjust the water level slightly by tilting the elbow.

Finished view. I'm hanging a DIY LED. This is 20W COB LED from ebay, with a heatsink from a washing machine. It is a crappy LED (and it may not be strong enough for Disa), and I'll probably change it with a more efficient one. 2015 version of Bridgelux Vero 18 and 29 should be great.

Some of Disa was growing in Perlite+sphagnum moss. I top-dressed with aquarium gravel, so they don't float up when water is filled up. Some of them weren't doing well, and I hope this Ebb-flow will help them.

The water pump is connected to a digital timer which has 1 minute resolution. Then it gets turned on twice a day for 10 min. The plants will be soaked in the water about 15-20 min each time.
It took a bit of time to make the table, but the ebb-flow system part would take about 30 min to assemble. I used a tall container for the growing box because our ambient RH is low, and I wanted to keep RH high. For now, I'm keeping it open top since it can keep around 60-90% RH. In the winter, I'll probably need to put the cover.
Comments
Post a Comment