 |
CXA3070 + TE holder |
I have posted about other LED lighting options for plant growing. The high-efficiency T8-LEDs from Sunritek are fairly impressive. Philips XF-3535L involves a bit more work, but it is very easy to assemble. Here I'm showing how I assemble a Chip-on-board (COB) based project. It is the workhorse and the performance leader of DIY-LED world at this moment.
From my point of view, the 3 advantages of COB LEDs are the easy assembly, high efficiency, and affordable cost. You can make a highly efficient fixture with the individual LEDs, but generally it ends up costing much more than COB based units. I think the majority of DIY LED people have migrated to use COB technology now. Some of the grow light makers are finally catching up and started to use this technology. If you prefer a pre-made COB grow lights (but you need to pay at least 2x of the DIY cost), following companies offer COB based products (there are others using lower quality COBs, but not included):
- Area51: Kit A (1x Vero 29, $195) with Bridgelux Vero 29 v2.0 4000K driven at 2.1A (89W) and higher efficiency Kit B (2x CXB3590, $295), driven at 1.4A (107W total).
- Go Green LEDs: 200W model (4x CXB3070, $539), 300W model (6x CXB3070, $799), with each COB driven at 1.4A (50W each)
- Northern Grow Lights: Several models with Bridgelux, Citizen, and Cree ($299 and up). Also, good source of parts for DIY build.
- Pacific Light Concepts: CXP-420 (6x CXB3590, 420W, $825), CXP-250 (4x CXB3590, $625)
- Tasty LED: CXB3590 based models, starting from $210.
- Timber Grow Lights: CXB3590 or Vero29 based models. They also have a pre-assembled DIY kit. 4x CXB3590 for $399; total of 200W, driven by a Meanwell HLG-185H-C1400B dimmable driver (very high quality). All you have to do is hang them up.
High efficiency: I don't pretend to understand fully why COB LEDs are better, but one of the main advantages is that it can deal with heat more effectively (with any LEDs, heat is the enemy of the efficiency). Here is a link which talks about the advantage of COB. Efficiency of LEDs is a complex topic, and it depends on how you design it (amount of current, how heatsink is used etc). In all LEDs, when you drive the LEDs soft (i.e. you use much lower current/power than the nominal current recommended by the manufacturer), you can increase the efficiency. Using this approach, some people can achieve 70% radiant efficiency from Cree CXB series. 100% radiant efficiency means that all of the energy stored in the electricity is converted to light without any waste. So 70% radiometric efficiency means 70% is converted to light, and about 30% is wasted as heat. Typical commercially available LEDs (not the low-end LEDs) and HPS has the radiant efficiency of around 30% (here and Table 1 of here), and the fluorescent light such as T8 and T5HO has much lower efficiency. To achieve 70% efficiency, you do need to buy a lot of LEDs so they are pretty expensive (actually these extreme designs are more for the bragging right, and not so cost effective). However, with COB LEDs, we can achieve reasonably high efficiency (40-50% easily) which rival (or exceed) the efficiency of $1000 class grow light at the fraction of the cost.
Anyway, here I'll start with materials list (with links to the source), show step-by-step method of assembly, and talk about the results of output measurements.
Materials:
You basically need 6 items: LED, constant current driver, CPU heatsink, 18 gauge wires + AC plug, Thermal paste (Thermal grease, Thermal Interface Material, TIM), and 5-12V AC/DC adaptor. When you are looking for parts, Octopart is a convenient search engine to find the best price of electronic parts.
- LED:
- Cree CXB3070-0000-000N0HAB30G (80 CRI, 3000K, AB bin, $40 from digi-key)
- LED Holder: Ideal 50-2234C ($1.98 from Newark, I prefer this over the following TE holder) or TE Connectivity 2-2154857-2 ($1.62 for 2 pieces from digi-key, you need 2 pieces per COB)
- 2x metric M3-0.5 screws (length of 6-10mm) (or #6-32 1/2")
In this step-by-step, I'm using a CXA3070 (70 CRI, 5000K, BB bin). But there is a newer version, CXB3070 (data sheet), with a better efficiency, so I'm linking to CXB3070. Other popular choices are Cree CXB3590 + Ideal Holder 50-2303CR and Bridgelux Vero 18 and Vero 29. - Drivers: LEDs requires direct current (DC), and you need to connect LEDs to a constant current (CC) driver. A CC driver regulates the output DC current so that it will put out a designated amount of current (e.g. 1.5A) regardless of the load (voltage). This is different from the other type of power supply called constant voltage (CV) drivers. The computer power supply is an example of CV drivers, where the power supply provides 12V (or a fixed voltage), and the current is determined by the load. If you are careful, CV drivers can be used with LEDs, but most people play safe by going with CC drivers.
When selecting the CC driver, you want to determine how hard you are going to drive the LEDs (amperage of the driving current) at first, and then check whether the forward voltage required for the LED is within the constant current region of the driver. This process of matching CC drivers to LED is a bit confusing for beginners. The nominal (testing) current for CXB3070 is 1.9A and maximum current is 2.8A, according to the data sheet. So you can select any CC drivers which are rated to be 2.8A or lower. If you use a higher amperage, you can get a higher light output, but you sacrifice the efficiency. In other words, if you compare the total output of 4x CXB3070 driven at 700mA (under-driven) to that of 1x CXB3070 driven at 2800mA (hard driven at the maximum current), you'll get much more total light output from 4x underdriven CXB 3070 at 700mA even though the total energy consumption is similar. This is the reason why most people under-drive (use a low current) to achieve an extremely high efficiency. Under-driving initially costs more money, though, because you need to get a lot more LEDs to achieve a reasonable amount of total output, but you may be able to save money in a long run (less electricity consumption). I generally target an amperage slightly below the nominal current listed in the data sheet. For example, 1.4 amp is a fairly good driving current for a CXA/CXB3070 as well as for a Vero 29. Then I look up the data sheet (p.5 of CXB3070 datasheet) to find the required forward voltage for the given amperage, which is slightly below 36V for CXB3070 at 1.4A. You want to make sure that the CC driver can supply the forward voltage. In the photo below, there are several examples of constant current drivers, all from eBay. The top one (50W driver) provides 1.5A and it can provide this constant current in the region of 28-38V. The bottom one (20W driver) provide 0.6A in 28-40V. So both of these are appropriate drivers for CXB3070.
I had good luck with eBay DT-PF1005 (e.g. $12+$1.50 shipping from this seller, see the assembly section below for the photo of this CC driver). This one has decent AC/DC conversion efficiency, and the actual current is around 1.4A. With some other eBay drivers, I could get only 1 A (labelds as 1.5A driver) and/or 10% lower efficiency than DT-PF1005. If you want to have a more consistent and higher quality driver, Mean Well drivers are popular. LPC-60-1400 would be a cheap and good choice (1.4A, 9-42V, up to 85% AC/DC conversion efficiency, around $16 from Octopart search) for CXB and CXA3070 or Vero 29. Here is a link to OnlineComponents.com, who has $8 flat shipping rate. The cheap shipping rate applies to Alaska, too!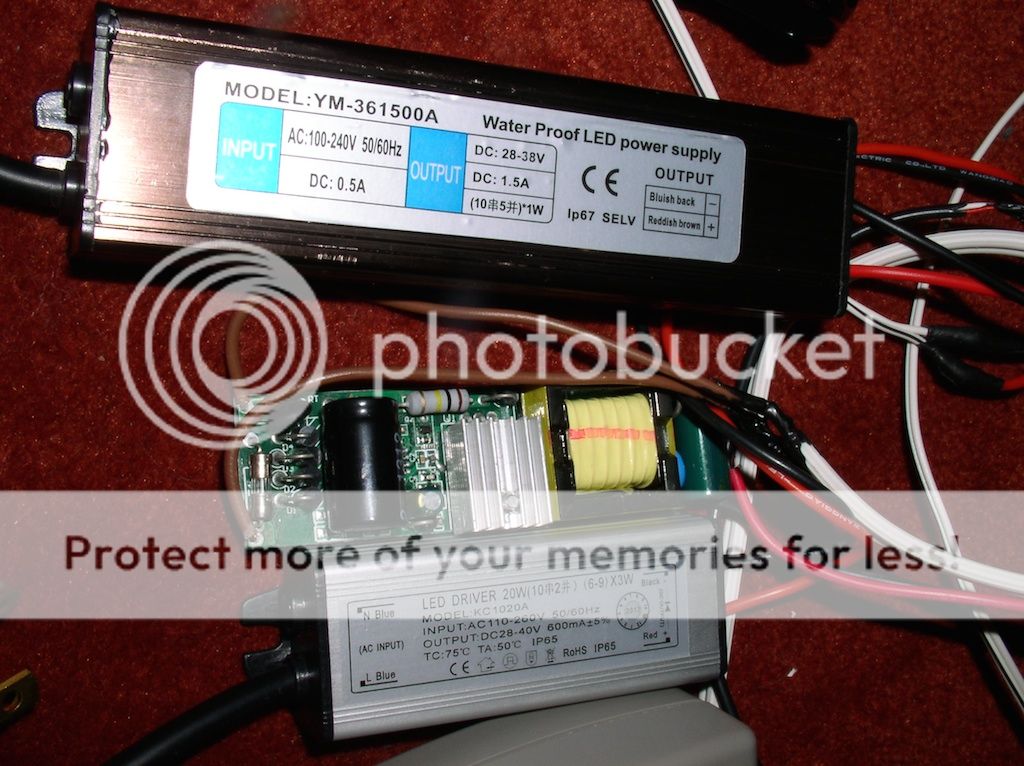
eBay constant current drivers: (from top to bottom) 50W YM-361500A (1.5A), 30W (1.05A), 20W KC1020A (0.6A, inefficient, and not recommended) - Heatsinks: whatever CPU heatsink with a fan. I just use whatever I find (usually from old computers or a trash transfer station). But if you need to buy it, Arcric Alpine 11 Plus is a popular choice ($17 from Amazon). One issue with Alpine 11 Plus is that you can't replace the fan with other fans easily. But it is reasonably quiet. I heard a smaller and cheaper Arctic Alpine 64 GT Rev. 2 works, too ($8.50 from Amazon).
- Wire: Cerrowire 18-2 Thermostat Wire (18 AWG, 210-1002BR, $9.47 from HomeDepot, manufacturer's information). These Class 2 wires are usually used at 24V, but I believe the maximum voltage is 60VDC. I would use something else (like THHN/THWN) if the project requires a higher voltage.
- Thermal compound/paste: Arctic Silver Ceramique 2 or any other thermal paste used to attach CPUs to heatsinks.
- 5-12V AC/DC adpater to drive the CPU fan. I usually use cell phone chargers or wall-warts which I can find at garbage transfer stations. Here is a link to a pre-wired adapter for CPU fans (I've never used this).
Cree COBs come in different grades (bins) depending on the efficiency: for example, CXB3070 comes in AB or AD bins for 80 CRI 3000K and BB or BD bins for 70 CRI 4000K and 5000K. Cree tests the produced LEDs and categorize them into different bins. The higher bin for each color temp (AD and BD bins) outputs more light per given power (i.e. higher efficiency) than the lower bin (AB or BB bins), so they are more desirable. But it could be difficult to get these top bins. If you look at the data sheet, there is a list of bins for each color. Bridgelux doesn't use binning.

- drill press (or drill), drill press vise is useful, but you can do without it.
- M3-0.5mm tap (e.g., this or this from Amazon) and matching 2.5mm drill bit (e.g., this from Amazon)
- some methods of connecting wires (soldering or some connectors)
- wire stripper
- Digital multimeter is helpful.
Materials update (Fall 2016):
There are quite a few new products released in 2016. Cree CXB3590 was the king in 2015, but not any more. I would look into Bridgelux Vero 29 (data sheet) or Vero 18 (data sheet) generation 7. Citizen CitiLED CLU048 Version 5 is also an alternative, but they seem to be slightly less efficient than Vero gen.7 in general when you compare the similarly priced models (e.g. Vero 29 type B vs CLU048-1818C4 at $25-26, or Vero 18 type B vs CLU048-1212C4 at $10-13). But the smaller CLU048-1212 (data sheet) could be a bit better than Vero 18 in terms of efficiency.
Below I listed a couple possible combinations of LEDs and driver.
| LED | Driver | total lumen | total watt | current per COB (mA) | Vf per COB(V) | lumen/W | cost | comments |
|---|---|---|---|---|---|---|---|---|
| 4x Vero 29-B, BXRC-40E10K0-B-73, 4000K, CRI80 | HLG-120H-C1400A | 23820 | 135.6 | 700 | 48.4 | 176 | $150=$25*4+$50 | This should cover 4'x4' area for low-moderate light orchids (e.g. Paphiopedilum). Dimmable. |
| 2x Vero 29-D, BXRC-40E10K0-D-73, 4000K, CRI80 | LPF-60D-36 | 9754 | 57.8 | 835 | 34.6 | 169 | $80=$25*2+$30 | This should cover 4'x2' area for low-moderate light orchids (e.g. Paphiopedilum). Dimmable. |
| 2x CLU048-1212C4-40AL7K3, 4000K, CRI80 | LPC-60-1400 | 8048 | 47.4 | 700 | 33.9 | 169 | $41.5=$13.25*2+$15 | This is a very inexpensive combination, if you use this over 4'x2' area, the edge may be a bit dark end. Non-dimmable. |
| 2x Vero 29-C, BXRC-40E10K0-C-73, 4000K CRI80 | LPC-100-700 | 17730 | 90.6 | 700 | 64.7 | 196 | $88=$32*2+$24 | If this is used over 4'x2' area, it will be intense, and probably good for full sun carnivorous plants. It is an overkill for most orchids. LPC-100-1400 can be used, too (with parallel connection). If you need more light, you can use LPC-150-1050 (24774 lm, 178lm/W). |
The values are from the simulators provided by the manufacturers with the case temperature (Tc) set to 50C. The drivers included here are from Meanwell. Cost is the approximate cost of LEDs+driver, shipping cost not included. Cost of heatsinks and other materials not included (about $20 per cob).
- Here is the heatsink I'm going to drill. I need to make two holes to attach the LED holder. Before drilling, I mark the position with the punch. If you don't punch, the skiny drill bit wobbles around, and it is difficult to make the hole accurately. With soft aluminum (or copper), you don't have to hit the punch hard. Sinece I don't want to crack the CPU fan, I removed the fan before I punch it. Also, I would start drilling the first hole, and then mark the second hole. In this way, you can adjust the 2nd hole if the 1st hole isn't accurately made at the mark.
- Here is a small drill press, which is useful for this. I think some people can make holes with drill, but I've never tried it. I also use the drill press vise (the blue thing) to hold the heatsink. The vise is not bolted to the table, and floating on the drill press table. When the drill bit starts to drill, it falls into the punch mark and it self-align if you leave the vise floating. I use this 2.5mm drill bit from Amazon, which is the appropriate size for metric M3 screws.
- At first, I wasn't accustomed to drill metal, and I broke quite a few drill bits (so you might want to have a couple extra bits). You shouldn't press too hard, but too light pressure isn't good, neither (the drill bit becomes dull). I go relatively slow; I apply gentle but firm pressure for 2 seconds or so, and then I release the pressure to cool the drill bit. I keep repeating this until it goes through the thick part of the heatsink. You should be careful when the drill bit goes through and reaches to the fin side. Sometime the drill bit gets bound (and breaks) at this time. I also use a small drip of whatever oil. This time I used a red bicycle chain oil. After a couple broken bits, I haven't broken drill bits for a while.
- After the 1st hole is done, I align the COB LED holder, and mark and punch the 2nd hole.
- Now two holes are done, so I'm taping the holes (making the threads so that you can screw in the machine screws). When tapping small holes, it is a bit tricky to initiate the thread because it is difficult to keep the tap perpendicular to the surface. I learned this method of using the drill press as the guide to hold the tap perpendicular. I am turning the tap manually (not using the drill motor to cut the thread). I put the chuck key handle into the chuck hole to turn the tap manually. While I push down the drill press handle gently, I turn the tap clockwise with the chuck key. After one turn, I slightly back-turn the tap counter-clockwise to clear the accumulated metal. You need to loosen the drill press handle pressure for the back turn. It seems complicated, but it is pretty easy. With this method, I've never broken the tap or stripped the threads. I use metric M3x0.5mm tap (e.g., this or this from Amazon)
- I finished tapping two CPU heatsinks. At this stage, you should test if the screw goes in smoothly. I also sanded lightly around the hole to remove burrs.
- Now I put a small amount of thermal grease, and press the COB down. Note that you want to make the thermal grease as thin as possible, so don't put lots of grease. Also, I try to press down the COB hard with a bit of twisting motion (to spread the paste), but you shouldn't touch the yellow region.


I think I put a bit too much, so I had to wipe off the excess thermal grease.

- Here is a link to a better instruction of how to use IDEAL Chip-Lok COB LED holder:
- Two CXA3070's are attached to two heatsinks.
- Now I attached the COB LED holder with short M3 screws (6-10mm length). If you assemble computers by yourself, you probably have lots of excess M3 screws which are used to attach motherboard to the case, or securing PCI cards to the case. Then to attach the wire, you strips about 7mm of insulation, and push it into the holes of the holder. Pay attention to + and -, marked on the LED. + of LED should be connected to + of the constant current driver.
- Now all wired up. The bottom-right, round one is Bridgelux Vero 29. You don't need a LED holder for Vero because the attachment holes are directly on the COB LED. For the Vero, I used a connector, which snaps onto the Vero 29. Alternatively, you can solder the wires to the terminal. The two silver regions, right and left of the top screw, are the soldering points. If you are going to solder, I would solder before you attach the COB to the heatsink.
- Now we are going to connect the LED wires to the constant current driver. The driver has DC side and AC side. You want to connect the DC + of the driver to the + of LED and DC - of the driver to the - of LED. I usually solder this connection, but this kind of Wago connector could be useful.
- Green/Yellow = ground (round stick)
- Brown = Live/Hot (smaller flat blade)
- Blue = Neutral (bigger flat blade)


Then the other side of the driver (AC side) has brown, blue, and green/yellow (yellow with green stripe) wires, which is AC input. You need to connect an AC plug (again, with Wago Connectors, Wire-Nuts, or solder). The round stick is the Ground (refer to the next photo for the AC outlet). Then there are two flat blades; the bigger one is Neutral and the smaller one is Hot (Live). So you want to connect the color coded AC side of the driver to:


Measurement method:
I took measurements of several COB LEDs driven at different current. The most relevant quantity is the amount of photons emitted per given energy consumption. I am using a quantity called photosynthetic photon flux density (PPFD) for the measurement. Note that most people are familiar with foot-candles and lux, which represent how human eyes feel the light intensity. Human eyes are very sensitive to green light, but not to red or blue light. So a small amount of green light seems to be brighter than lots of blue and red light for us. But plants can use the light between 400-700nm of wave lengths. So PPFD counts the number of photons between 400-700nm without weighing each photon by human eye sensitivity, so this is a more useful quantity than foot-candles/lux (see here for additional info).
Most people aren't familiar with PPFD because the instrument which measures PPFD is much more expensive ($150-$1500) than foot-candle/lux light meters. The unit of PPFD is µmol m-2 s-1. Full sun in the summer gives about 2000 µmol m-2 s-1, which is about 10000 foot-candles. Hopefully this information help to understand/feel the intensity expressed in PPFD.
 |
| The LED and multimeter on the left, and a light meter (this isn't the exact type of meters I used in the data below) on the right. |
- Li-Cor Quantum PAR sensor, LI-190 (a link to the newer version of this sensor)
- Dr.Meter LX1330B lux/fc meter.
I also included cheap eBay "100W" COBs. These are extremely cheap (like <$10 for "100W" COB):
 |
| Clockwise from the top left: Cree CXA-3070 (3000K, middle bin; Z2), ebay "100W" Warm White (around 3000K), ebay "100W" Cool White (around 5-6000K), ebay "30W" Warm White (around 3000K) |
Measurement results:

In the figure above, I plotted PPFD at 12" on Y-axis and wattage (at LED) on X-axis. As you go toward the top-left corner, the efficiency increases. Different types of plot symbols indicate the different LEDs; CXA3070 is square, Vero 29's are circle, and cheap eBay COBs are 'x'. Red color means warm white (3000K), blue color means cool white (5000K), and green is in-between (4000K).
Interpretation:
- There are measurement errors, but Vero 29 and CXA3070 seem to perform similarly well. But the cheap eBay "100W" COBs are not worth getting due to very low efficiency. These corresponds to the over-wrapping blue and red 'x's (blue for cool white and red for warm white) at the left bottom corner of the figure. Vero 29 and CXA3070 are about 50% more efficient than the eBay COB. More about this later.
- The efficiency does increase with lower current. But it is not so easy to see from this figure.
- With regard to the driver efficiency (data not presented here), some of those cheap ebay drivers (30W and 50W) are pretty good (around 88% efficiency). But the 20W and some 50W driver were not great (around 78-82%). So, you need to be careful with which model you are going to get. Additionally lots of these cheap CC drivers doesn't output the current which is rated. I got 1-1.5A from several models of CC drivers. DT-PF1005 seems to be the one with more consistency (around 1.4A). So I recommend these if you want to go with eBay drivers.
To get the complete light output, you need an expensive equipment called an integrative sphere, which I don't have an access to. Although one can measure the total output by measuring many different spots in a flat plain with the quantum PAR meter I have (see this paper), it is too time consuming, so I measured only 1 point (12" in the middle) for each LED. This means that if the beam pattern is drastically different among different LEDs, my measurements would be misleading. By looking at them, the beam pattern doesn't look too different, though.
As a side note, here is an interesting video showing the measurements of commercial grow light fixtures with an integrarive sphere:
A note about inexpensive COBs from eBay (and other places):
When I started out with DIY COB LEDs, I started with the cheap eBay COB (I have 4 of those; 2x "100W" and 2x "30W"). The price has been going down continusouly, and "100W" COB is now less than $5! These are also sold on Amazon and some of the cheap LED flood lights use these COB. It may be tempting for people to buy those, but it is a false economy and it's not worth using these even if they are free. As my measurement showed, Cree and Bridgelux can have about 50% higher efficiency. This means that you need to run the eBay COB at 75W to get the same light output as CXA/Vero at 50W. So you are wasting 25 extra watt. With electricity cost of $0.19/kWh, eBay COB would cost extra $21.64 (=$0.19/kWh * 25W * 13 h/day * 365 days/year / 1000). So within 2 years, Cree or Bridgelux becomes cheaper (even if the eBay COB is free).
The following two videos are worth watching; I learned a lot about why these cheap "100W" COBs are not worth getting.
Great comparisons! Thanks
ReplyDeleteThank you for the comment!
DeleteThanks for the update on the LEDs and Drivers. I have mine stuff in hand and plan on putting my first fixture together this weekend. Thanks for all your help.
DeleteIt's going to be fun! I hope that it will work well for you!
DeleteThis is a great article, I studied this and other information before putting together my single cxb3070 used an old xbox360 heat sink and a small fan to cool it. I tryed to order the dtpf1005 driver through another seller other than the one stated here and got some other 50 watt driver that seems to work ok. I grew greens in the closet all winter under this light. I'm going to put together a few more possibly using citizen cobs.
ReplyDeleteExcellent! The technology advance quickly, and COBs are getting better and cheaper! I agree that Citizen CLU048 would have the best performance/cost at this moment. Earlier this year, I used CXB3590 (pretty impressive), but now you can get the similar performance with Citizen at a much cheaper price point. I haven't looked into it yet, but newer version of Vero seems to be also promising.
ReplyDeleteThe cheap eBay drivers have been working ok for over 2 years. None has failed out of 7 or so cheap drivers. I was originally worried about the quality, so I was surprised. The only problem with them is that there is a big variation in the current. 1.4 A driver can be putting only 1.1A, and another copy of the same driver could give 1.5A. So I'm recently paying a bit more for Meanwell drivers (cheap ones like LPC or APC series).
I have not checked anything but voltage wih my driver, I'm going to probably stick with the cheapie ebay drivers untill I get at least 4 of the same chips before I get a meanwell to series them through. Thinking about getting a few of those less than 5 buck bare board drivers for my next few lights, have to keep it cheap so I will probably get the smaller 36 volt citizen chips to keep the cost down. Looks like when cobs are in stock here in the states they sell out fast so you need to get them fast ive noticed. For another 60 bucks I can make up another 100watts of light looks like if I go with the 1212's and the ebay drivers, I got a bunch of old cpu coolers to mount them to.
ReplyDeleteGreat post! I realize it's 4 years old by now and I was wondering if you'd still recommend the same set up now or of there are any new technologies worth considering?
ReplyDeleteFor some applications (e.g. needs lots of space above the orchids), I would use COB. But I would probably use linear modules. It is easier to get more homogeneous light. https://orchidborealis.blogspot.com/2016/11/samsung-linear-led-module-h-series-gen-3.html The info in this link is a bit old, but Samsung F-type is still pretty good. Also I believe Bridgelux released Gen 3 of EB-strip this year. https://www.bridgelux.com/products/eb-series I used EB strip Gen 2 for my reef aquarium last year. It is fatter than Samsung F, so it doesn't fit inside of 3/4" U-channel (I attached it outside). But there is a slim version of Gen 3 EB-strip, which would be the one I chose.
Delete